
Currently I’ve struggled with Ubuntu settings. It’s specially about NVIDIA Drivers. I could see the official documentation, but it was not helpful for me. So, I decided to summarize the concepts about NVIDIA-Driver, CUDA Toolkit, CuDNN for using docker properly. I am using Ubuntu servers for running docker and NVIDIA Graphic cards are installed inside them. Most deep learning framework what I used to use is Pytorch. This article deals with basic concepts of NVIDIA-Driver, CUDA and CuDNN. In addition to that I will summarize the ways to install and uninstall NVIDIA-Driver as well as CUDA Toolkit. Finally I will summarize the docker installation and the way of passing gpu arguments inside the docker.
I’ve searched several good articles to prepare my posts and will give a reference to each quotes.
Let’s begin!
1. Basic Concepts
NVIDIA-Driver, CUDA, CuDNN, nvidia-smi, nvcc sometimes make you very confused. I was also. In this section I summarized the basic usages for those and the easy ways to distinguish the differences. Finally I want to deal with the common misunderstandings
Q1. How can I recognize NVIDIA-Driver, CUDA and CuDNN ?
ref: https://www.programmersought.com/article/57794836777/
nvidia-smi => Result after installing NVIDIA-Driver
nvcc –version => Result after installing CUDA
cat /usr/local/cuda/include/cudnn_version.h | grep CUDNN_MAJOR -A 2 => After installing CuDNN
1) NVIDIA-Driver : NVIDIA Graphics Card Driver
2) CUDA : Compute Unified Device Architecture, which is a general parallel computing launched by NVIDIA architecture. The architecture enable the GPU to solve complex computing problems.
3) CuDNN : It is used for deep neural networks GPU acceleration library. It can be intergrated into advanced machine learning frameworks, such as Google’s Tensorflow, UC Berkeley’s caffe framework, Facebook’s PyTorch framework and so on.
– CuDNN is a deep learning GPU acceleration library based on CUDA. Only with it can deep learning calculations be completed on the GPU.
– The CUDA platform did not install the CuDNN library at the beginning. Developers only install the CuDNN library when they need deep learning GPU acceleration. The working speed is much faster than CPU.
Q2. What is the difference between CUDA (Driver) library and CUDA runtime library ?
ref: https://leimao.github.io/blog/CUDA-Driver-VS-CUDA-Runtime/
ref: https://bit.ly/2QEQerH
1) CUDA (Driver) library : It is installed with NVIDIA Driver and intended for low-level CUDA programming.
shared library name : libcuda.so
header file : cuda.h
sudo find / -name cuda.h
sudo find / -name libcuda.*
“nvidia-smi” indicates the CUDA Driver version. ( Here 11.0 )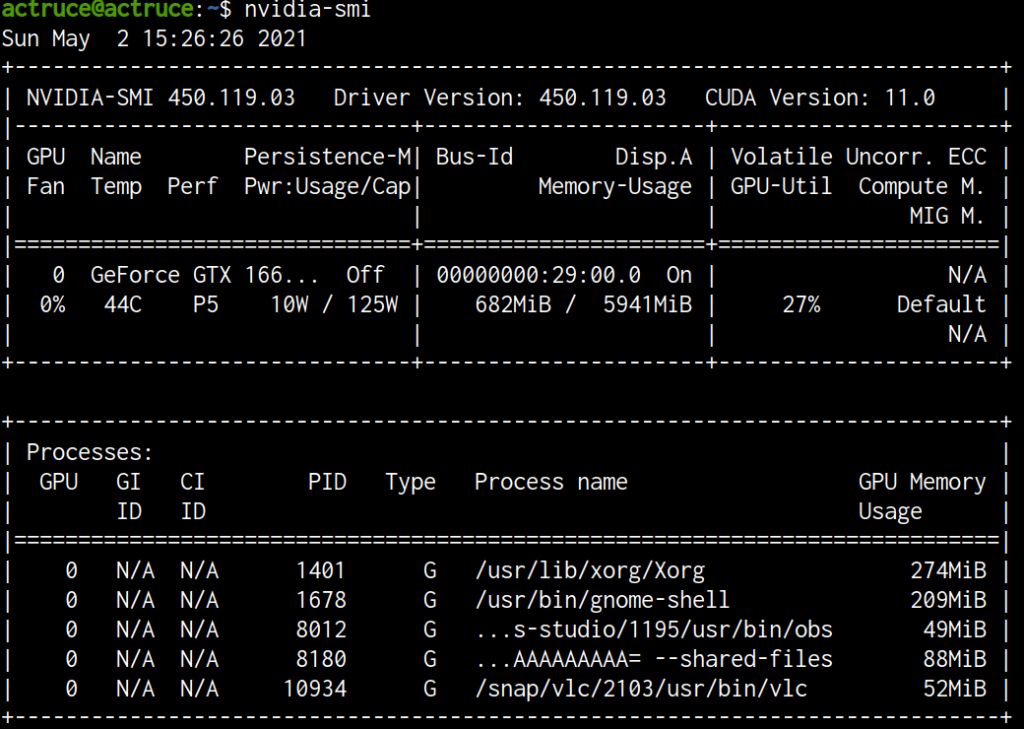
2) CUDA (Runtime) Library : CUDA Runtime library is installed with NVIDIA CUDA Toolkit, and it is intended for high-level CUDA programming.
shared library name : libcudart.so
header file : cuda_runtime.h
sudo find / -name cuda_runtime.h![]()
sudo find / -name libcudart.*
“nvcc –version” indicates the CUDA Runtime version. ( Here 11.3 )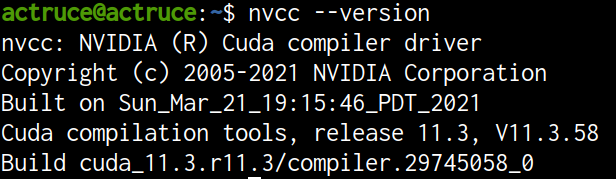
3) Difference between CUDA Driver Library and CUDA Runtime Library
While the CUDA Driver API and Runtime API do share functionalities in common, in most of the scenarios, using CUDA Runtime API is sufficient to solve the problem and the code is much simpler.
Q3. What are CUDA Toolkit and NVCC ?
ref: https://www.programmersought.com/article/57794836777/
1) CUDA Toolkit : It is a complete one officially provided by Nvidia Tool Installation package.
Use the CUDA Toolkit provided by Nvidia’s official website to install the tools needed to develop CUDA programs, including CUDA program compilers, IDEs, debuggers, etc., various library files corresponding to CUDA programs and their header files.
2) NVCC : It is CUDA compiler driver (translator), similar to gcc is the compiler of the c language.
Q4. What are the common misunderstandings about these ?
1) Pytorch needs complete CUDA toolkit installation
-> No. it only needs to use CUDA dynamic link library to support the running of the program.
Pytorch itself and CUDA-related parts are compiled in advance. If Anaconda installs Pytorch and
other frameworks that will use CUDA, it will automatically install CUDA toolkit for users.
2) CUDA toolkit version is independent from NVIDIA Driver version.
-> No. Each version of the CUDA toolkit corresponds to a minimum version of the CUDA Driver,
which means that if the version of the CUDA Driver you install is lower than the official
recommendations, it is likely to fail to run normally.
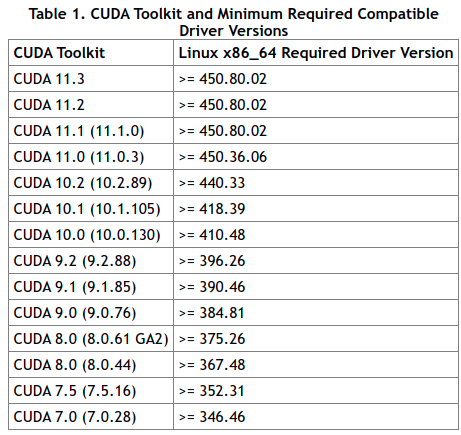
https://docs.nvidia.com/deploy/cuda-compatibility/index.html
3) You should install CUDA Toolkit to use docker with GPUs
-> No. If you only installed NVIDIA-Driver and NVIDIA container runtime, it is enough to run
docker with GPUs.
4) To use docker with GPUs, one needs to install NVIDIA-docker runtime (NVIDIA container runtime)
-> Yes, But. To use –gpus all option, you need to have nvidia-container-runtime-hook
(It probably needs to install nvidia-docker)
5) Your NVIDIA Container Toolkit inside docker enables you to use CuDNN and NVCC command.
-> No. normal NVIDIA Container Toolkit will only get you nvidia-smi. If you need cuDNN or
nvcc –version you can pull from other NVIDIA Docker base images, such as
nvidia/cuda:10.2-cudnn7-devel-ubuntu18.04
2. Quick Installation Guide
ref: https://docs.nvidia.com/cuda/cuda-installation-guide-linux/
If your Ubuntu server is clean and yet doesn’t have any NVIDIA driver or CUDA toolkit, then you can use this quick installation guide. There are several ways to install NVIDIA driver and CUDA toolkit at once, but I want to recommend to use Deb package manager.
1) Perform pre-installation actions ( I will go over these steps at the section 4 )
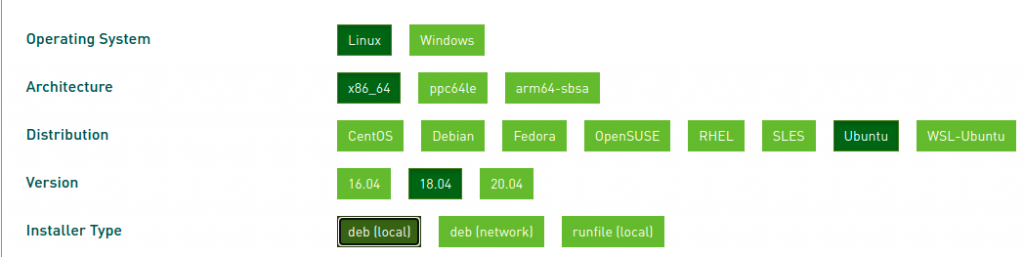
2) You will find the .deb packages and its install instructions below.
https://developer.nvidia.com/cuda-downloads
3) If you select OS, architecture, distribution, version and installer type, then you may see the installation instructions such below.
wget https://developer.download.nvidia.com/compute/cuda/repos/ubuntu1804/x86_64/cuda-ubuntu1804.pin
sudo mv cuda-ubuntu1804.pin /etc/apt/preferences.d/cuda-repository-pin-600
wget https://developer.download.nvidia.com/compute/cuda/11.3.0/local_installers/cuda-repo-ubuntu1804-11-3-local_11.3.0-465.19.01-1_amd64.deb
sudo dpkg -i cuda-repo-ubuntu1804-11-3-local_11.3.0-465.19.01-1_amd64.deb
sudo apt-key add /var/cuda-repo-ubuntu1804-11-3-local/7fa2af80.pub
sudo apt-get update
sudo apt-get -y install cuda
+ Post Installation
sudo reboot
export PATH=/usr/local/cuda-11.3/bin${PATH:+:${PATH}}
export LD_LIBRARY_PATH=/usr/local/cuda-11.3/lib64${LD_LIBRARY_PATH:+:${LD_LIBRARY_PATH}}
If you follow this quick guide, you can install NVIDIA Driver and CUDA toolkit together.
3. NVIDIA Driver & CUDA Uninstallation
ref: https://docs.nvidia.com/cuda/archive/10.2/cuda-installation-guide-linux/
ref: https://linoxide.com/how-to-install-nvidia-driver-on-ubuntu/
ref: https://partners-intl.aliyun.com/help/doc-detail/109111.htm
But, in the most of cases, the situation will not be that simple. Your system may have previous NVIDIA Driver or CUDA toolkit and even some drivers can be corrupted. You should uninstall previous damaged NVIDIA driver and CUDA before you install the new NVIDIA Driver and CUDA toolkit. I want to inform how to check current status of your system and how to uninstall the previous ones properly. ( It means that it is not harmful to other system applications )
Before I will start sections, I would like to mention what a bad official conflicting guide is.
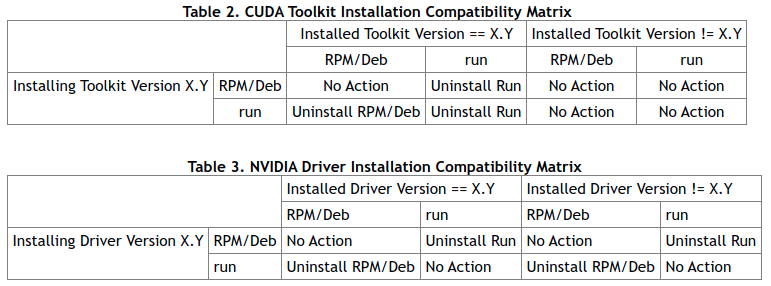
ref: https://docs.nvidia.com/cuda/cuda-installation-guide-linux/index.html
Did you notice the meanings of Installed and Installing ? Yes. you are right. Installed means what has already been installed and Installing means what is going to be installed. But this matrix doesn’t show anything. Nobody cares. Your re-installation can be done after cleaning previous ones. That’s it!
Step 1: Check if you installed NVIDIA Drivers by runfile or deb package manager (apt)
1) In the case of runfile installation
# If you the file below, then it means you have installed by runfile
1-1) CUDA Toolkit
sudo ls /usr/local/cuda-X.Y/bin/uninstall_cuda_X.Y.pl
or
sudo ls /usr/local/cuda-X.Y/bin/cuda-uninstaller
( When you install by using runfile, you should select CUDA Demo Suite for 11.3.
Otherwise, cuda_uninstaller file will not be copied to your /usr/local/cuda/bin )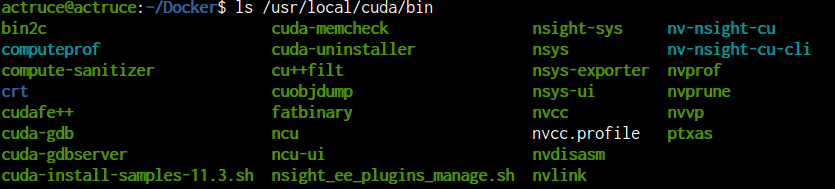
# You can find cuda-uninstaller file in the /usr/local/cuda/bin
( in my case, it was /usr/local/cuda-11.3/bin/ )
1-2) Nvidia Driver
sudo ls /usr/bin/nvidia-uninstall
2) In the case of deb package manager installation (apt)
# You can check deb package manager installation by using dpkg command.
2-1) NVIDIA Driver
dpkg -l | grep nvidia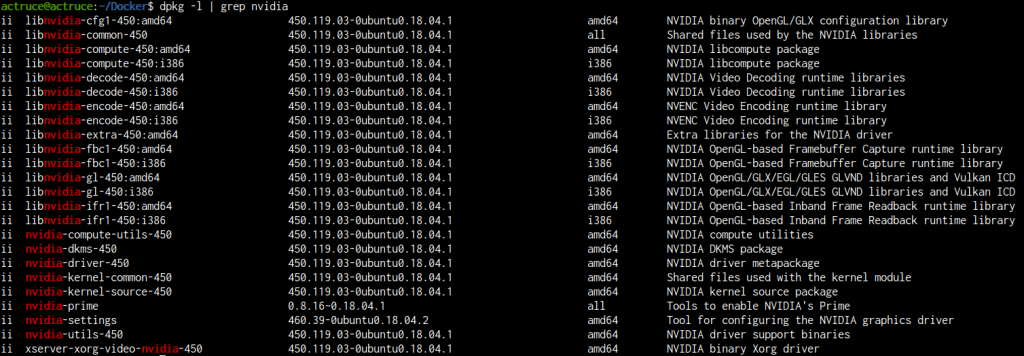
# You may see the nvidia-driver-xxx like above. ( At the above, it is nvidia-driver-450 )
2-2) CUDA Toolkit
dpkg -l | grep cuda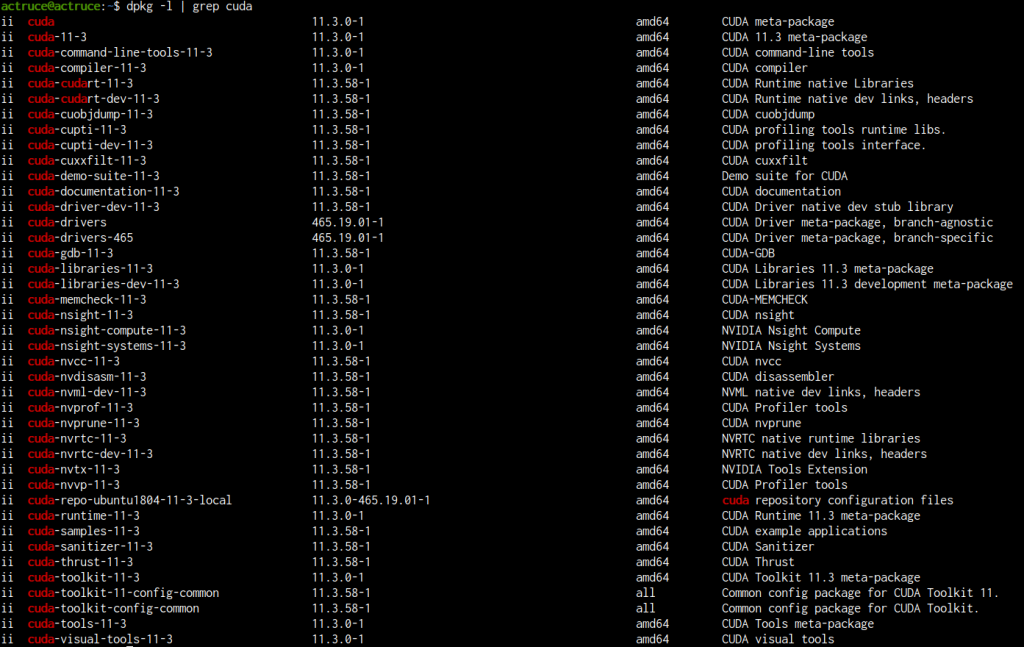
Step 2. Uninstallation
1) runfile uninstall
If you can’t find the below files, you probably installed NVIDIA Driver or CUDA toolkit by deb package managers. If you installed by runfile, then you may find the below files, i.e. uninstallers. ( You need root privileges to execute the uninstaller files )
1-1) CUDA toolkit
sudo /usr/local/cuda-X.Y/bin/uninstall_cuda_X.Y.pl
or
sudo /usr/local/cuda-X.Y/bin/cuda-uninstaller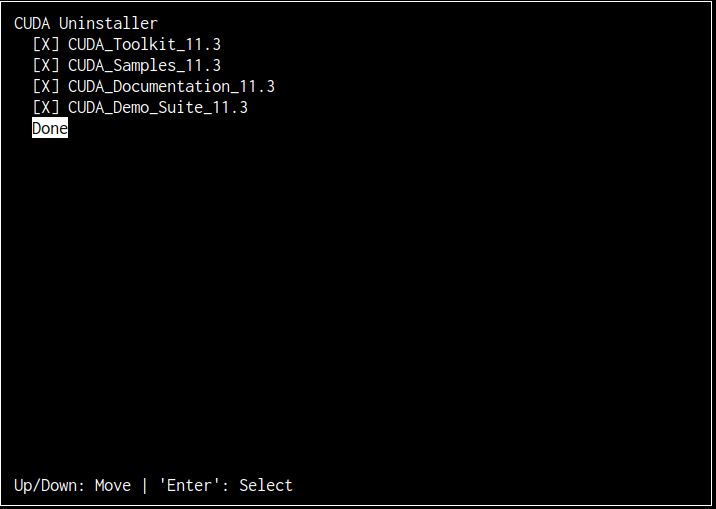
1-2) NVIDIA Driver
sudo /usr/bin/nvidia-uninstall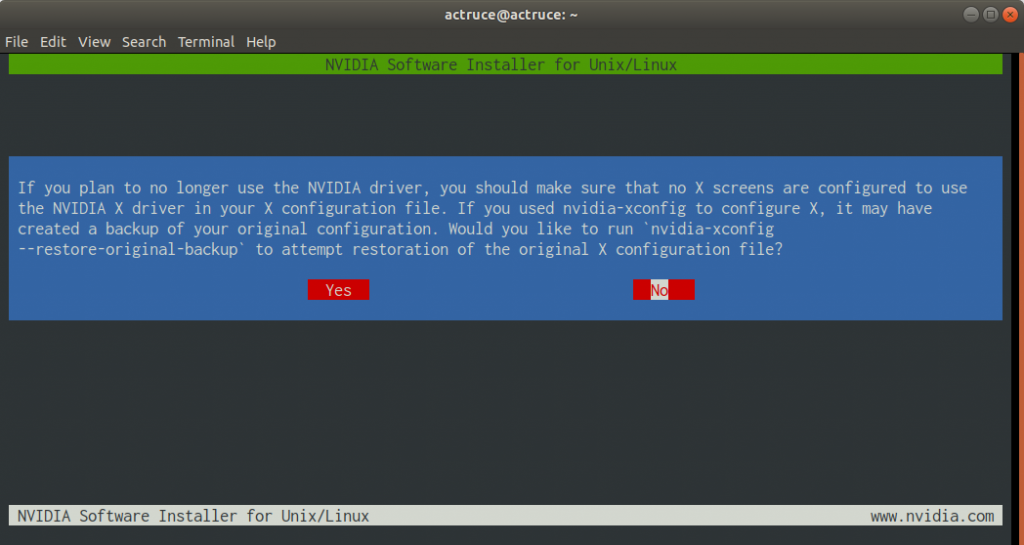
2) deb package uninstall
※ Because I have referenced old CUDA toolkit installation guide such like 10.2 [ link ], so that I was trouble after reinstalling CUDA toolkit (as in Quick Installation). By following instructions in new official guide, I could resolve the problem. [ link ]
2-1) NVIDIA Driver uninstall
sudo apt-get –purge remove “*nvidia*”
2-2) CUDA toolkit uninstall
sudo apt-get –purge remove “*cublas*” “*cufft*” “*curand*” “*cusolver*” “*cusparse*” “*npp*” “*nvjpeg*” “cuda*” “nsight*”
2-3) NVIDIA Driver + CUDA toolkit uninstallation at the same time
sudo apt-get –purge remove “*cublas*” “*cufft*” “*curand*” “*cusolver*” “*cusparse*” “*npp*” “*nvjpeg*” “cuda*” “nsight*”
sudo apt-get –purge remove “*nvidia*”
sudo apt-get autoremove
# Reboot
sudo reboot
# If it doesn’t work its most probably due to secure boot being on using UEFI mode.
# To disable secure boot on ubuntu follow the instructions at:
# ref: https://wiki.ubuntu.com/UEFI/SecureBoot/DKMS
4. NVIDIA Driver Installation
ref: https://phoenixnap.com/kb/install-nvidia-drivers-ubuntu
ref: https://docs.nvidia.com/cuda/archive/10.2/cuda-installation-guide-linux/
ref: https://medium.com/@aspiring1/installing-cuda-toolkit-10-0-and-cudnn-for-deep-learning-with-tensorflow-gpu-on-ubuntu-18-04-lts-f7e968b24c98
There are mainly two ways to install a NVIDIA Driver. The one is by using runfile and the other is deb package manager ( Ubuntu system). If you using runfile, you should go into tty session (text mode which doesn’t use X-Server that runs GUI ).
Step 1. Pre-Installation
# Check Graphics Card is there on your system.
lspci | grep “VGA”
or
lspci | grep -i nvidia
# (If you do not see any settings, update the PCI hardware database)
sudo update-pciids
# Check whether the your graphics card is CUDA supported
Go to this link, https://developer.nvidia.com/cuda-gpus
# Verify You Have a Supported Version of Linux
uname -m && cat /etc/*release
# Verify the System Has gcc Installed
gcc –version
# If your system has hybrid graphics, then you should open nvidia-prime-select
prime-select query
prime-select nvidia (To set nvidia graphic card to be prime)
# Check which is the latest driver to install
https://www.nvidia.com/Download/index.aspx?lang=en-us
# Choose an Installation method
1) Installation by package manager (Deb or RPM packages)
2) Installation by runfile
Step 2. Installation
1) Installation by deb package manager : Deb package manager in Ubuntu
# Search for Nvidia Drivers
apt search nvidia-driver
# Update System Package Repository
sudo apt update
# Install the right driver for your GPU
sudo apt install [driver_name]
ex), sudo apt install nvidia-driver-450
# Reboot
sudo reboot
2) Installation by runfile : distribution independent package
# the procedures followed by this article, because official instruction is not so kind to do
# ref: https://www.iridescent.io/tech-blogs-installing-cuda-the-right-way/
# obtain right runfile here, https://www.nvidia.com/Download/index.aspx?lang=en-us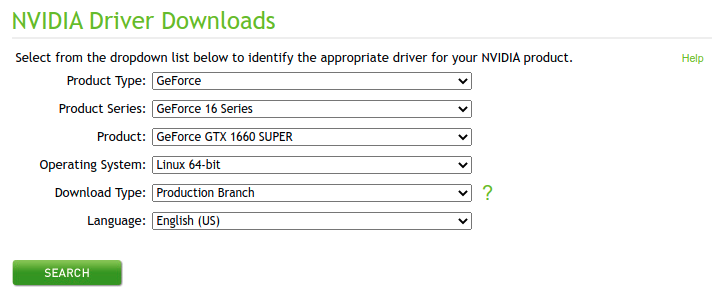
After several selections, you can download a runfile. You can give it a execution authority to the runfile.
chmod +x NVIDIA-Linux-<system>-<version>.run
# If you are using X-Server, then you should enter the tty session by pressing Ctrl+Alt+F3 (Return to GUI mode by Ctrl+Alt+F1, this can be different by machines)
# Stop the X-Server that runs in GUI
sudo service lightdm stop
sudo service gdm stop (when above not worked)
(Kill X-server/window manager when above two methods not worked)
sudo ./NVIDIA-Linux-<system>-<version>.run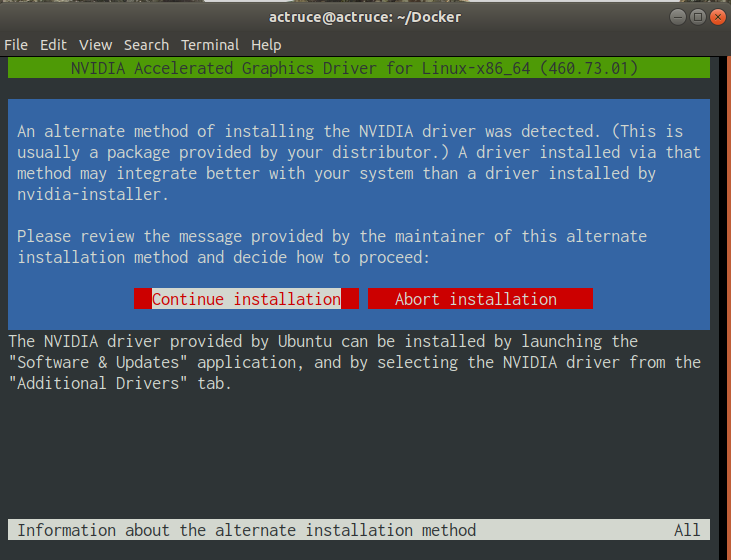
After doing several selections, the installation will have been completed.
sudo reboot
Step 3. Post-Installation
# Validating your Driver installation
nvidia-smi
# Verify the Driver Version
cat /proc/driver/nvidia/version
# If not shown
modinfo nvidia
# If neither of these commands work, then the drivers have not installed correctly
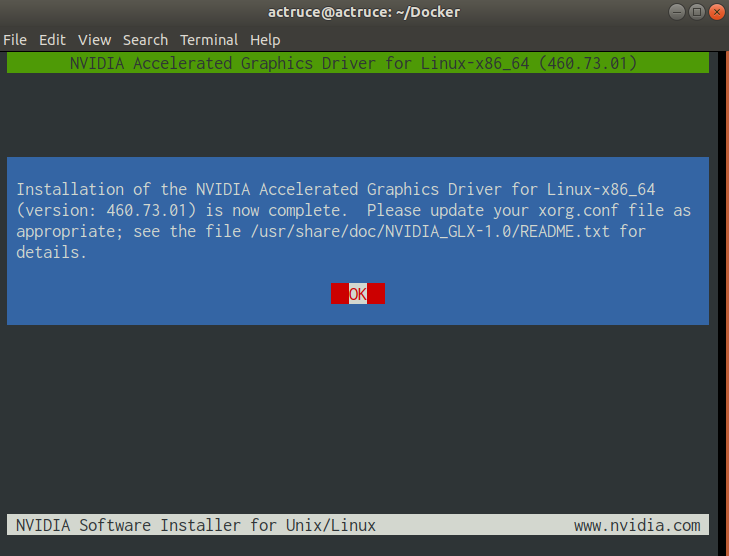
5. CUDA toolkit Installation
After NVIDIA Driver deb package installation, We can do CUDA Toolkit installation by deb package manager, but this might be trouble. You can see the error message right after installing CUDA toolkit.
“Failed to initialize NVML: Driver/library version mismatch”![]()
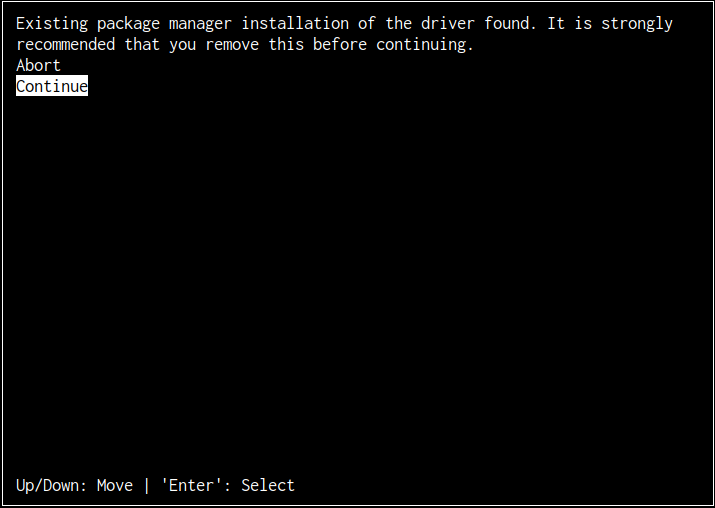
Because CUDA toolkit installed a different nvidia-driver which is not the same as previously installed one.
ex) nvidia-driver-465, but nvidia-driver-450 installed before
So, there were warning about this, WARNING said nvidia-installer will attempt to uninstall as best it can. Please see the file ‘/var/log/nvidia-uninstall.log’ for details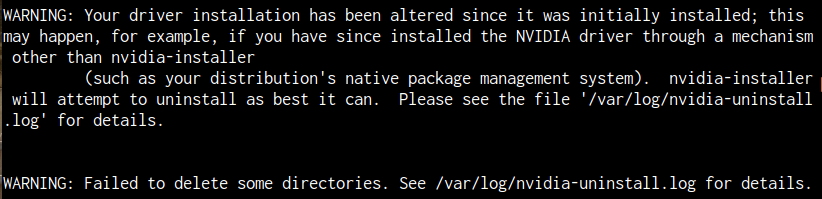
“sudo reboot” will help you, but this is not the radical solution. You should use runfile installation if a NVIDIA Driver has already installed. If you choose runfile installation, you can avoid to install redundant NVIDIA Driver installation during the installation procedures. That’s why I recommend to use runfile installation. If you choose .deb package manager installation, you can’t avoid that a new NVIDIA Driver will be installed. It is said that previous NVIDIA Driver can be removed as possible as the installer can, but some previous files will be remained. That can be a future trouble.
1) Installation by runfile
# The procedures followed by this article, because official instruction is not so kind to use.
# ref: https://www.iridescent.io/tech-blogs-installing-cuda-the-right-way/
# Go to this link to download runfile, https://developer.nvidia.com/cuda-toolkit
# If you want to get previous cuda versions, visit https://developer.nvidia.com/cuda-toolkit-archive
sudo sh <downloaded file>
ex) sudo sh cuda_11.3.0_465.19.01_linux.run
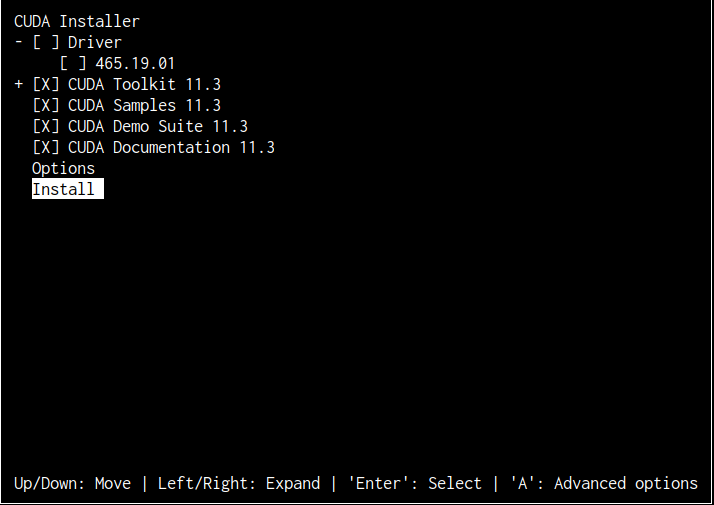
If NVIDIA Driver has already been installed, DO NOT check Driver installation.
If you don’t select “CUDA Demo Suite”, then cuda_uninstaller will not be installed in version 11.3
( I found this after just selecting CUDA Toolkit itself. There was no cuda_uninstaller at all )
# Set the path variables after installation ( This is optional, it is done automatically in the CUDA toolkit 11.3 )
export PATH=$PATH:/usr/local/cuda/bin
export LD_LIBRARY_PATH=$LD_LIBRARY_PATH:/usr/local/cuda/lib64
It is noticed that $PATH and $LD_LIBRARY_PATH has been set in the installation summary. And there were some warnings about NVIDIA-Driver version.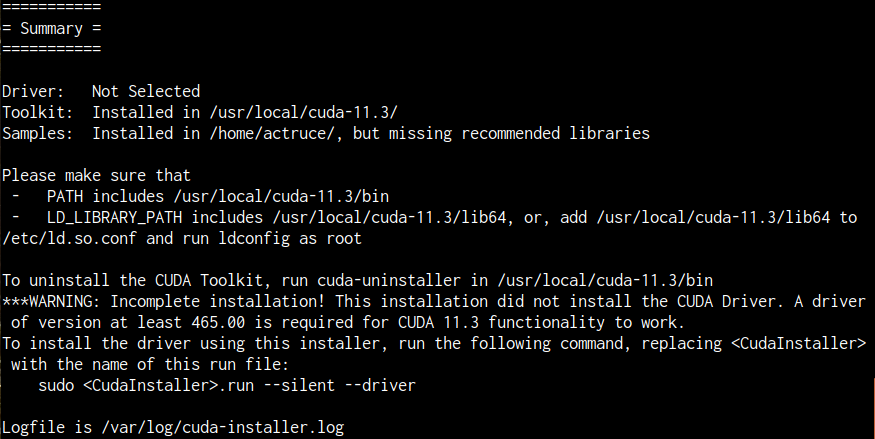
2) Installation by deb package manager
As I mentioned, this is exactly the same in quick installation guide (section 2). This is only recommended when your system have neither NVIDIA driver or CUDA toolkit.
6. Trials
I’ve tried to do some trials for uninstalling and installing NVIDIA Driver and CUDA toolkit. The trials are listed below and I will upload Youtube videos for that. Enjoy it!
딥러닝을 위한 NVIDIA-Driver 설치 1편 – Basic Concepts, https://youtu.be/1oIo3PVOrIc
딥러닝을 위한 NVIDIA-Driver 설치 2편 – Quick Guides, https://youtu.be/xCeB5hQnDF0
딥러닝을 위한 NVIDIA-Driver 설치 3편 – Uninstall & Install 01, https://youtu.be/Qgr-qYKwMTo
딥러닝을 위한 NVIDIA-Driver 설치 4편 – Uninstall & Install 02, https://youtu.be/fscsg8S03hk
Quick Installation
– NVIDIA Driver + CUDA Toolkit
by .deb package manager
Installation #2
– NVIDIA Driver by .deb package manager (remained)
– CUDA toolkit by runfile (after removing .deb package)
Installation #3
– NVIDIA Driver (450) by .deb package manager
– CUDA toolkit by runfile
-> Not selecting “CUDA Demo Suite” makes that cuda_uninstaller will not be copied
Installation #4
– NVIDIA Driver(450) by .deb package manager
– CUDA toolkit by .deb package manager
-> Driver/library version mistmatch
Installation #5
– NVIDIA Driver by runfile
– CUDA toolkit by runfile
7. Trouble Shooting
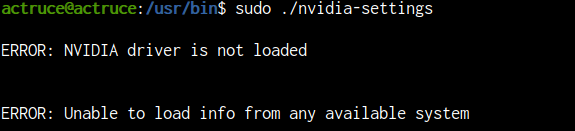
1) NVIDIA Driver will not be loaded after booting.
Youtube [ Link ]
I have recently experienced this issue. And the error messages are like below.

After reading several articles, I’ve convinced that the kernel in my machine has been updated and that affects the problems. So, I checked the kernel installation logs and installed linux-images
sudo tail -n 300 /var/log/dpkg.log | grep linux-
dpkg –list | grep linux-image
I’ve noticed that my previous kernel version was 5.4.0-72, but newly installed version was 5.4.0-73. And its installation date is not so before. I ensure that new version of kernel makes troubles.
To resolve this issue, there might be three choices.
1. If you can use grub selection when system booting, you can choose previous kernel version.
2. You can reinstall NVIDIA-Driver for the new kernel.
3. You can remove new kernel and use previous kernel.
I have to say, this is by far the best post on cuda and nvidia-drivers I have ever seen!
Thank you so much
I second that Berkay!
Thaks!